Easter is almost here again and this time, we have Haru-chan and her pet chick, Chioux, to join us for the celebration.
Spring is Haru-chan's favourite season of the year. She is a big fan of jelly-filled chocolate and cute little animals. Her free time is spent rescuing stray animals - lil' Chioux being one of them. That happened a long time ago, one cold, rainy day.
Now the two are the best of friends and all ready for some Easter fun!
[caption id="attachment_706" align="alignnone" width="490"]
 Say hello, Chioux![/caption]
[caption id="attachment_704" align="alignnone" width="490"]
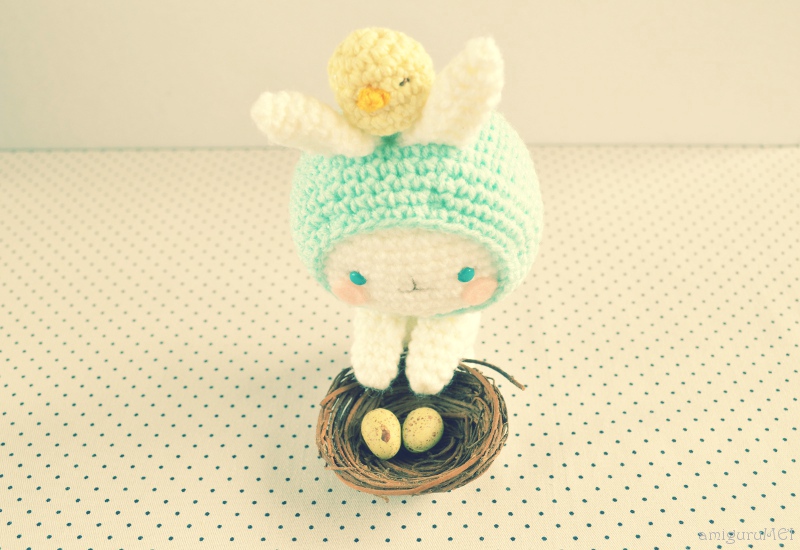 Poor eggies...[/caption]
[caption id="attachment_705" align="alignnone" width="490"]
 Ahhhh...spring![/caption]
Make your own Haru-chan and baby Chioux!
Abbreviations
- Ch: chain
- Sc: single crochet
- Dc: double crochet
- Inv dec: invisible decrease
Materials
- 2.50 mm hook
- 1.75mm hook
- Similar sized yarn in white, cyan and pastel yellow
- Embroidery thread in mustard yellow
- Sewing thread in dark brown
- Blue brads
- Pink felt
- Sewing needle
- Darning needle
- Polyester fiberfill
Head
With white yarn:
Round 1: 6 sc in magic circle (6)
Round 2: 2 sc in each sc around (12)
Round 3: *2 sc, sc in next sc*, repeat 6 times (18)
Round 4: *2sc, sc in next 2 sc*, repeat 6 times (24)
Round 5: *2 sc, sc in next 3 sc*, repeat 6 times (30)
Round 6: *2 sc, sc in next 4 sc*, repeat 6 times (36)
Round 7: *2 sc, sc in next 5 sc*, repeat 6 times (42)
Round 8 – 13: Sc in each sc around (42)
Round 14: *Inv dec, sc in next 5 sc*, repeat 6 times (36)
Round 15: *Inv dec, sc in next 4 sc*, repeat 6 times (30)
Round 16: * Inv dec, sc in next 3 sc*, repeat 6 times (24)
Round 17: * Inv dec, sc in next 2 sc*, repeat 6 times (18)
Begin stuffing the head.
Round 18: * Inv dec, sc in next 1 sc*, repeat 6 times (12)
Round 19: Inv dec all around (6)
Fasten off and weave in ends.
Designing the face
Eyes:
- Pop in the blue brads below Round 10.
- There should be 6 stitches in between each eye.
- With your dark brown sewing thread, sew a small diagonal stitch from the side-centre to the top-centre of each eye.
- Knot the ends off at the bottom of the head, which will be hidden later on when you place the head in the hood.
Nose & mouth:
With dark brown sewing thread:
- Thread your needle through from the bottom of the head to the centre between the eyes on Round 10.
- Sew a vertical line to the bottom of Round 11.
- Make small backstitches to the left and right of this line to form curves for the mouth.
- Knot the ends off at the bottom of the head.

Hood
With cyan yarn:
Round 1: 6 sc in magic circle (6)
Round 2: 2 sc in each sc around (12)
Round 3: *2 sc, sc in next sc*, repeat 6 times (18)
Round 4: *2 sc, sc in next 2 sc*, repeat 6 times (24)
Round 5: *2 sc, sc in next 3 sc*, repeat 6 times (30)
Round 6: *2 sc, sc in next 4 sc*, repeat 6 times (36)
Round 7: *2 sc, sc in next 5 sc*, repeat 6 times (42)
Round 8 – 14: Sc in each sc around (42)
Place the finished head inside the hood then continue with the next round.
Round 15: *Inv dec, sc in next 5 sc*, repeat 6 times (36)
Round 16: Sc in each sc around (36)
Round 17: *Inv dec, sc in next 4 sc*, repeat 6 times (30)
Fasten off and leave a long end for sewing.
Using a backstitch, secure the hood in place and trim excess yarn.
Body
With white yarn:
Round 1: 6 sc in magic circle (6)
Round 2: 2 sc in each sc around (12)
Round 3: *2 sc, sc in next sc*, repeat 6 times (18)
Round 4: *2 sc, sc in next 2 sc*, repeat 6 times (24)
Round 5 – 8: Sc in each sc around (24)
Round 9: * Inv dec, sc in next 2 sc*, repeat 6 times (18)
Fasten off and leave a long end for sewing.
Stuff with polyester fibre.
Ears (make 2)
With white yarn and 1.75mm hook:
Round 1: 3 sc in magic circle (3)
Round 2: 2 sc in each sc around (6)
Round 3: *2 sc, sc in next sc*, repeat 3 times (9)
Round 4 – 9: Sc in each sc around (9)
Fasten off and leave a long end for sewing.
Arms (make 2)
With white yarn and 1.75mm hook:
Round 1: 7 sc in magic circle (7)
Round 2 – 6: Sc in each sc around (7)
Fasten off and leave a long end for sewing.
Legs (make 2)
With white yarn and 1.75mm hook:
Round 1: 5 sc in magic circle (5)
Round 2: 2 sc in each sc around (10)
Round 3: Sc in each sc around (10)
Fasten off and leave a long end for sewing.
Tail
With white yarn and 1.75mm hook:
Round 1: 7 sc in magic circle (7)
Fasten off (ss to first st) and leave a long end for sewing.
Pet chick (body)
With pastel yellow yarn and 1.75mm hook:
Round 1: 6 sc in magic circle (6)
Round 2: 2 sc in each sc around (12)
Round 3: *2 sc, sc in next sc*, repeat 6 times (18)
Round 4 – 6: Sc in each sc around (18)
Round 7: * Inv dec, sc in next sc*, repeat 6 times (12)
Stuff with polyester fibre.
Round 8: Inv dec all around (6)
Fasten off and leave a long end for sewing.
Pet chick (beak)
With mustard yellow embroidery thread and 1.75mm hook:
Round 1: 3 sc in magic circle (3)
Fasten off and leave a long end for sewing.
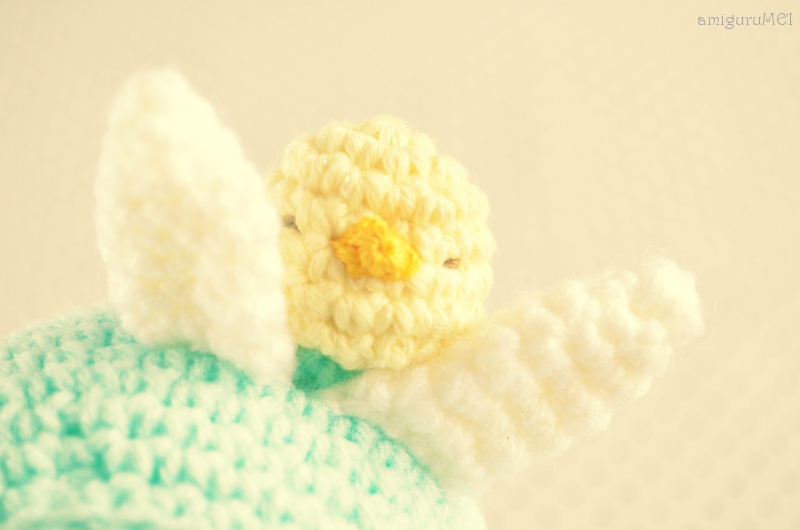
Flatten the piece and sew it into the body of the pet chick, below Round 4.
Assembly
- Sew the body onto the hood (that should now contain the head).
- Sew the arms onto the front of the body, right below the hood.
- Sew on the legs.
- Sew on the tail.
- Sew on the ears – give the pieces a slight pinch to mould them into shape.
- Give the pet chick a pair of eyes – use the dark brown sewing thread to make a small horizontal line, one stitch away, to the left and right of the beak.
- Sew the pet chick onto Haru-chan’s hood. Let it peek out from between her ears.
- Cut two small round pieces of pink felt and glue them onto the cheeks.
As this is an original amiguruMEI pattern, kindly do not claim it as your own. You may place a link to this pattern from your site, but please do not repost it onto your page. Remember to share a picture of your own kawaii versions of Haru-chan and tiny Chioux with us!
[caption id="attachment_709" align="alignnone" width="490"]
 Happy Easter![/caption]

This is adorable ! ♥ I will give it a try.
ReplyDeleteVery cute!!! You've defiantly improved from sayo and nara!!!
ReplyDeleteI made your cuuuuute bunny. :-) It is a great pattern. Thank you for sharing. <3 https://www.facebook.com/photo.php?fbid=349677035137291&set=a.317390948365900.62714.100002849935522&type=1&theater
ReplyDeletetoo adorable for words!
ReplyDeleteAdorable! Thank you for sharing your fabulous ami patterns. Love them all!
ReplyDeleteSomehow my head got more hexagonal than round ^^ but with the hoodie it looks quite round (or more like an oval - but I love it :) ) can't wait to make the rest of the body
ReplyDeleteThank you for this adorable pattern!!!
Hello! I really really want to make this exactly like it is in the picture and I don't have the perfect cyan color, but one close enough. However, the website I found it on has many different types of yarn. I was wondering which type of yarn you used?
ReplyDeleteHi Rika,
ReplyDeleteWe used acrylic yarn. The thickness is about the size of a 2mm crochet hook. Do share your finished Haru-chan with us! :)
Hi... You should really sell these! Like, each one can be different and have different accessories (bow, ribbon, bell, etc.) I tried making it but my head is way too big for the body and I put the ears wrong.... ;(
ReplyDeleteJaslyn
This is the cutest Ami bunny I have seen yet. Thank you for posting the pattern for us. I will definitely put a link to this page so others can see your awesome work.
ReplyDeleteHi Rika!
ReplyDeleteI used acrylic yarn. All the best!
I really liked it and I've just finnished mines :) but sadly it is not as cute as your own :( but still I am happy beacause it came out kind of cute for my first amigurumi ! :) Thanks for the pattern :)
ReplyDeleteI think you need to see this: http://ichipooh.wordpress.com/2013/11/21/mau-moc-haru-chan-va-baby-chioux/
ReplyDeleteThis pattern, along with Tuxedo Sam, has been posted on this blog (I'm sure, without your permission).
I really want to make it! But, I can't find that blue brads. Where do you get that kind of brads? Do you buy it online? Thank you !
ReplyDelete[…] Bunny 83. Haru-chan and baby Chioux 84. Carrot Bunny 85. Lil Granny Bunny 86. Hello […]
ReplyDeleteHello, I'm really want to make this bunny for my friend's daughter as her 1st birthday gift. Can you tell me its size please? ^^
ReplyDelete[…] Tutorial: https://amigurumei.com/2013/03/24/free-easter-amigurumi-pattern-haru-chan-and-baby-chioux/ Blog: https://amigurumei.com […]
ReplyDelete[…] Tutorial: http://amigurumei.com/2013/03/24/free-easter-amigurumi-pattern-haru-chan-and-baby-chioux/ Blog: http://amigurumei.com […]
ReplyDeletei just stuck making hood in round 16. why my hood become bigger? >.<
ReplyDeletecan u help me?
Hey there! It really depends on the yarn thickness that you're using. If both the head and hood yarn are of the same size - don't worry, when you decrease it should fit well. If you're using two different yarn sizes, then increase only until the width of the head :) hope that helps!
ReplyDelete